Dishwasher Maintenance Checklist for Cleaner, Longer-Lasting Appliances
Written by
Editorial Team
Research and editorial staff
Dates
Published
Last updated
What changed: Expanded the model-aware dishwasher guide with loading, water-quality, troubleshooting, and recordkeeping details.
Checked by our editors.How we estimate repair costsEditorial policy
Sources
- How to Clean the Dishwasher Filters — Whirlpool Product Help
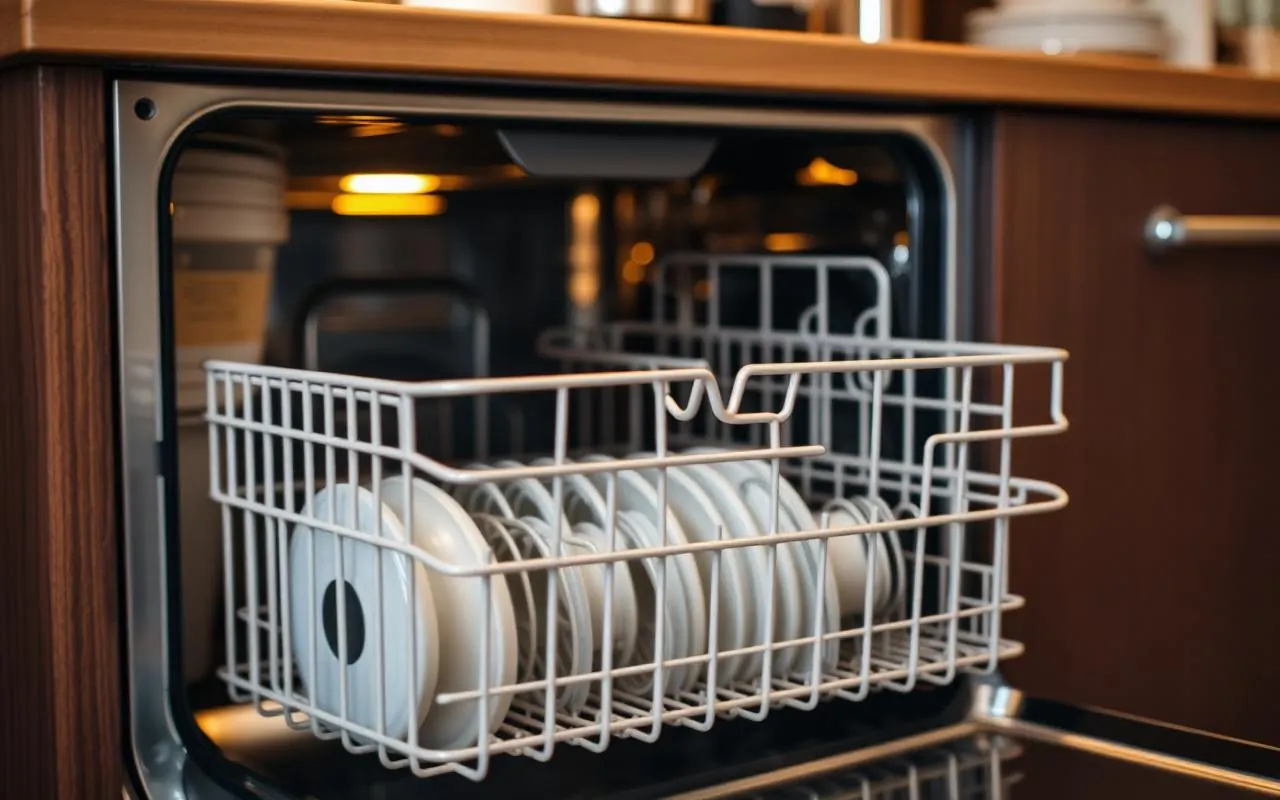
A dishwasher can collect food, grease, minerals, detergent residue, and standing water even when its tub looks clean. The result may be grit on glasses, odor, weak spray, slow drainage, or leakage. Most routine care involves accessible parts, but filter design, approved cleaners, and removal steps vary. Use the exact model manual before taking anything apart.
Quick maintenance schedule
| Task | Planning frequency | Why it matters |
|---|---|---|
| Scrape large scraps | Every load | Limits debris reaching the filter and pump |
| Check spray-arm clearance | Every load | Prevents blocked water movement |
| Wipe door edge and dispenser | Weekly | Removes residue outside the main spray pattern |
| Inspect and clean the filter | Monthly or as needed | Supports cleaning and odor control |
| Run an approved cleaning cycle | Monthly or as needed | Controls grease and mineral film |
| Inspect racks, drainage, and visible hoses | Every few months | Finds wear, blockage, and leaks |
These are planning intervals, not universal rules. Heavy use, hard water, visible residue, or model instructions may call for a different schedule.
Scrape without over-rinsing
Remove bones, toothpicks, labels, and large scraps. Plates do not normally need to be made spotless under the faucet. Excessive pre-rinsing wastes water and may not match the detergent system. Do not load wood, delicate glass, unsafe plastics, or other items the manufacturer excludes.
Face dirty surfaces toward the spray path and avoid nesting bowls. Keep tall pans and utensils clear of the arms. Before starting, gently spin each accessible spray arm; it should not strike a dish or rack. Make sure lightweight items cannot flip over and collect dirty water. Put sharp utensils where they cannot damage a rack, seal, or person unloading the machine.
Loading errors can imitate mechanical failure. A pan can block the detergent cup, a spoon can stop an arm, and stacked bowls can shield one another. If one load cleans poorly, inspect the arrangement before changing detergent or assuming the pump has failed.
Clean the removable filter correctly
If the manual identifies an owner-removable filter, switch the machine off and remove the lower rack. Unlock the assembly only in the documented direction. Rinse loose debris with warm water and use a soft brush with mild dish soap for stubborn residue. Reinstall and lock it securely before operating the appliance.
Do not force a filter, use a wire brush, enlarge openings, or run the dishwasher without required filters. A loose or damaged filter can allow debris to circulate or reach the pump. Whirlpool notes that visible soil, odor, and gritty dishes can be signs that a filter needs attention, but its instructions do not replace guidance for another brand.
Some machines use a different filtration design or include parts that are not meant for routine owner removal. If the filter does not release with normal pressure, stop and verify the model procedure. Photograph the installed orientation before removal if that helps with correct reassembly.
Inspect spray arms, door, and dispenser
Clean visible spray holes with a soft brush or wooden toothpick only if the manual permits it. Do not use metal tools that can enlarge the holes. Repeated clogging may involve hard-water scale, a damaged filter, or debris in an inaccessible area. Confirm an arm turns freely after it is reinstalled.
Wipe the lower door edge, corners, gasket, hinge area, detergent cup, and rinse-aid cap. Look for cracked, flattened, or displaced gasket sections. Use only surface-compatible products, keep liquid out of controls, and never mix cleaning chemicals. A dirty gasket can contribute to odor, but a torn gasket or misaligned door is a repair concern rather than a cleaning problem.
Hardened detergent can keep a dispenser from opening. Clean only accessible residue and check that a rack or utensil is not blocking the cup. Do not lubricate the latch or dispenser unless the manufacturer specifies a product and method.
Match detergent and water conditions
Use a dishwasher detergent intended for the machine and follow dosing guidance. Too little product may leave soil, while too much can leave film and contribute to poor rinsing. Water hardness, cycle choice, load soil, and water temperature can all change the result. Adjust one variable at a time so you can tell what helped.
Cloudy glassware does not prove that the dishwasher needs repair. Temporary film may involve detergent or hard water, while permanent etching cannot be removed by cleaning the appliance. Check the manual, detergent directions, and local water conditions before using a descaler or rinse aid.
Use approved cleaning and descaling products
Run a dishwasher-cleaning or descaling cycle only with a product approved for the appliance and water conditions. Empty the machine when the product requires it, follow package ventilation directions, and avoid improvised household-cleaner combinations. A cleaner may remove film, but it will not repair a failed pump, heater, valve, sensor, or seal.
Never combine chlorine bleach, acids, ammonia, vinegar, or commercial products. Chemical mixtures can produce dangerous fumes or damage stainless steel, seals, and internal parts. If a product was used incorrectly, ventilate as directed by its label and seek appropriate safety guidance rather than adding another chemical.
Check drainage, racks, and leaks
A small amount of water may remain in some sump designs, but water spread across the tub requires attention. Check the filter and visible drain area, inspect an accessible hose for kinks, and look beneath the sink for a loose connection. Do not disconnect plumbing or open electrical panels without the correct shutdown procedure.
Inspect rack wheels, clips, and coated wires. Replace damaged wheels and address chipped coating before exposed metal rusts. Clean the exterior with a product approved for its finish; never spray cleaner into controls, vents, or the latch.
After maintenance, run only the test or normal cycle recommended by the manual. Stay nearby for the first part of the cycle, look beneath the door and adjacent cabinet, and check the floor again after completion. Stop if water appears, the pump grinds, or an electrical or burning odor develops.
Separate maintenance from repair
Routine care can correct debris, residue, blocked spray movement, or poor loading. It cannot safely resolve internal wiring faults, a failed heater, a leaking pump seal, damaged tub, control-board problems, or a hard-wired connection. Repeatedly restarting a machine with a persistent error may increase water or electrical risk.
Stop using the dishwasher for water beneath the cabinet, grinding, a burning odor, smoke, repeated drain errors, damaged wiring, or a door that cannot latch safely. See the dishwasher repair cost guide when maintenance does not restore normal operation, and use the dishwasher error-code guide for model-documentation context.
Keep a simple record
Write down the filter-cleaning date, product used, drainage result, visible leaks, rack damage, odor, grit, and exact error code. Add the cycle, detergent, and load pattern when poor cleaning is intermittent. This history helps identify recurring symptoms, gives a technician better evidence, and supports a repair-versus-replacement decision.
Related guides
Safety note: This article is general information. Follow the exact model manual and local code. Use qualified service for internal electrical or plumbing work and stop for smoke, burning odor, major leakage, or another immediate hazard.
Frequently asked questions
Related guides
Dryer Vent Maintenance and Warning Signs Every Homeowner Should Know
Learn dryer vent maintenance, restricted-airflow warning signs, lint-screen care, exterior vent checks, duct safety, and when to stop using the dryer.
Oven and Range Maintenance Checklist: Cleaning and Safety Tips
Follow an oven and range maintenance checklist for burners, elements, spills, door seals, self-clean cycles, temperature, ventilation, and safety warnings.
Refrigerator Maintenance Checklist: Monthly and Annual Tasks
Follow a practical refrigerator maintenance checklist for coils, seals, temperature, filters, airflow, leaks, cleaning, and early warning signs.
Disclaimer: Pricing reflects US national averages as of the publication date and varies by region, brand, and labor rates. This article is informational and does not replace professional inspection or repair advice. See our full disclaimer.